หากเพื่อนๆ ต้องการสร้าง VLAN ใหม่ บน Switch สิ่งที่ทุกคนทำคือการ Telnet / SSH เข้าไปในแต่ละ Switch จากนั้นสร้าง VLAN ที่ต้องการ แล้วเปลี่ยน IP Management ไปเรื่อยๆ จนกว่าจะครบ Switch ทุกตัว หาก Switch ในองค์กรณของเพื่อนๆ มี 5-10 ตัว ก็ไม่เป็นปัญหาเท่าไหร่ แต่หากมี 30-40 ตัวหล่ะ ก็ค่อนข้างลำบากใช่ไหมครับ
ในบทความนี้จะมาแนะนำ Python Library ที่ชื่อว่า netmiko เป็น Automate CLI ให้กับอุปกรณ์ Network ของเรา ซึ่ง Support หลาย Vendor มากๆ เช่น Cisco IOS/XE/NX-OS, Fortinet, Palo Alto และอื่นๆอีกมากมาย และที่สำคัญ เป็น Open Source ครับผม
Netmiko คืออะไร
Netmiko คือไลบรารี Python ที่ต่อยอดจาก Paramiko (SSH) เพื่อให้การสั่งงานอุปกรณ์เครือข่ายผ่าน CLI เป็นเรื่องง่ายขึ้น โดยรวมขั้นตอนยุ่งยากอย่างการเข้าสู่ระบบ, คิวคำสั่ง, รอ prompt, ปิด paging, และจัดการ delay ให้เรียบร้อยภายในไม่กี่คำสั่ง รองรับผู้ผลิตยอดนิยม (Cisco IOS/XE/NX-OS, Cisco ASA/FTD, Juniper, Arista, HP/Aruba, Fortinet ฯลฯ) เหมาะมากสำหรับงานอัตโนมัติแบบ “เร็ว ง่าย ได้ผลจริง” กับอุปกรณ์ที่ยังพึ่งพา CLI โดยรองรับการ Access ทั้ง Telnet และ SSH ครับ ที่สำคัญ เป็น Open Source ด้วยครับ
ในตัวอย่างนี้ เราจะมายกตัวอย่าง 2 ตัวอย่างที่คิดว่าเพื่อนๆใช้งานกันจริงๆครับ
- สร้าง VLAN ให้กับ Switch ทุกๆตัวในระบบของเรา
- Backup Configuration ของ Switch ทุกๆตัวในระบบของเรา เผื่อวันไหนเกิดปัญหาขึ้นมา จะได้สามารถ Restore ได้ในทันที
1. ติดตั้ง Library netmiko (ต้องติดตั้ง Python ก่อนนะครับ เพื่อนสามารถหา download และดูวิธีการติดตั้งได้ที่ https://www.python.org/ ได้เลยนะครับ) โดยใช้คำสั่ง
pip install netmiko
จากนั้นเริ่มทำการเขียน Script ได้เลยครับ โดย IDE ที่ผมเลือกใช้จะเป็น VSCode นะครับ หากเพื่อนๆถนัดตัวอื่นๆ เช่น Pycharm ก็สามารถใช้งานได้เช่นกันครับ
เริ่มต้นด้วยการเช็ค Connection ว่าสามารถเชื่อมต่อกับอุปกรณ์เราได้จริงไหม
from netmiko import ConnectHandlerSwitch_1 = {“device_type”: “cisco_ios_telnet”,“host”: “192.168.1.192”,“username”: “admin”,“password”: “P@ssw0rd”,}net_connect = ConnectHandler(**Switch_1)print(net_connect.find_prompt())net_connect.disconnect()
โดยสิ่งที่เพื่อนๆต้องไปเช็คดูอีกครั้ง คือ key ใน dict Switch_1 คือ device_type ครับ เพราแต่ละรุ่น แต่ละอุปกรณ์จะมี value ที่ไม่เหมือนกัน เพื่อนๆสามารถไปเช็คได้จาก https://github.com/ktbyers/netmiko/blob/master/netmiko/ssh_dispatcher.py#L49 ได้เลยครับ
โดยผลลัพธ์ที่เกิดขึ้น จะเป็นประมาณนี้ครับ

คือมีการ Print method find_prompt() ก็จะเห็นเป็นชื่อ Switch ของเรา นั่นหมายความว่า Connection สำเร็จแล้วนั่นเอง
คำสั่งต่อมาคือ send_command ครับ จะเป็นการส่ง Command ที่เราเขียนขึ้น ไปยังอุปกรณ์ของเราครับ จะใช้ในกรณีที่ไม่มีการเปลี่ยนแปลงค่า Config ของอุปกรณ์ เช่น Show หรือ Copy ครับ ซึ่งถ้าเปลี่ยนแปลง Config จะใช้อีกคำสั่ง โดยยกตัวอย่างเช่น show ip int brief
from netmiko import ConnectHandlerSwitch_1 = {“device_type”: “cisco_ios_telnet”,“host”: “192.168.1.192”,“username”: “admin”,“password”: “P@ssw0rd”,}command = “show ip int brief”net_connect = ConnectHandler(**Switch_1)net_connect.send_command(command)print(net_connect.send_command(command))net_connect.disconnect()
และจะได้ผลลัพธ์ดังรูปครับ

ถ้าต้องการ show command หลายๆ command พร้อมกัน เราสามารถเขียนตัวแปร List เพื่อเก็บคำสั่ง แล้ววน Loop เพื่อ Feed เข้า show command ได้ครับ
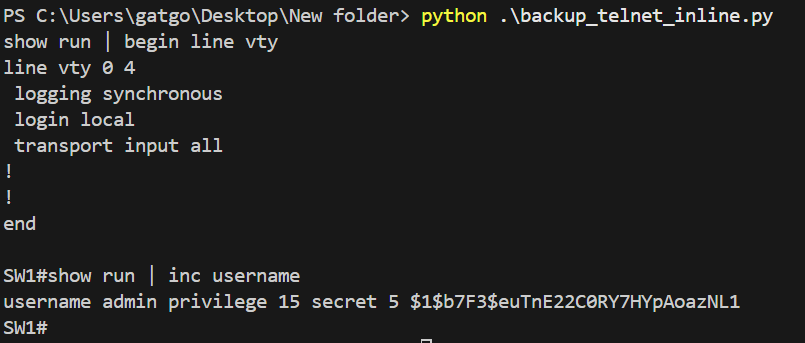
from netmiko import ConnectHandlerSwitch_1 = {“device_type”: “cisco_ios_telnet”,“host”: “192.168.1.192”,“username”: “admin”,“password”: “P@ssw0rd”,}show_commands = [‘show run | begin line vty’,‘show run | inc username’]net_connect = ConnectHandler(**Switch_1)output = “”net_connect.send_command(“terminal length 0”)for cmd in show_commands:output += net_connect.send_command(cmd, strip_prompt=False, strip_command=False)print(output)net_connect.disconnect()
ผลลัพธ์ที่ได้ จะออกมาเป็นแบบนี้
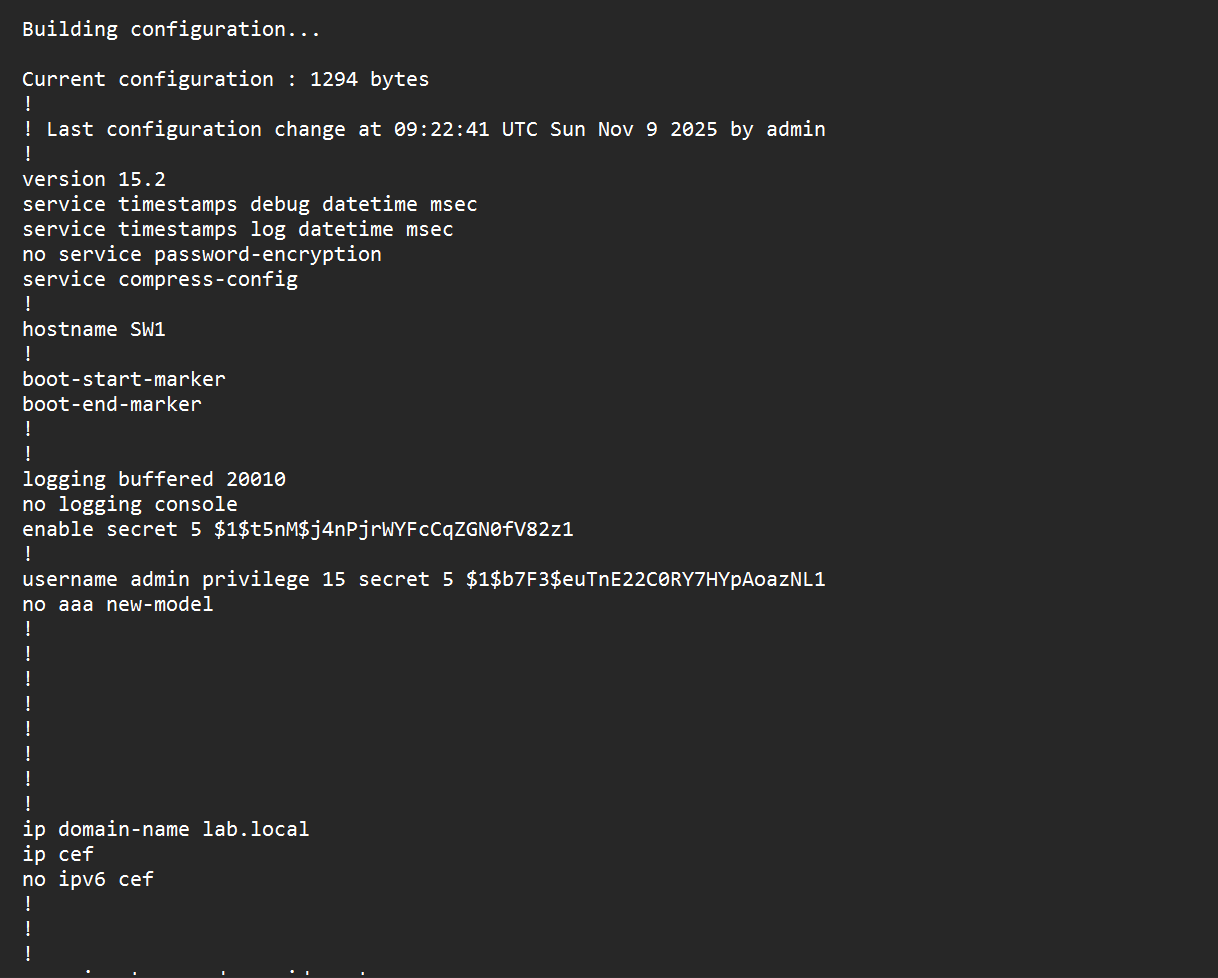
2. Method ที่ใช้ในการส่ง Config เข้าไปในอุปกรณ์ คือ send_config_set จะแตกต่างจาก send_command ตรงที่ Method send_config_set จะทำการเข้าโหมด conf t ให้อัตโนมัติ เพื่อความง่ายในการใช้งานครับ โดยยกตัวอย่างว่า เราจะทำการ config buffer ของ log และปิด console logging ครับ
from netmiko import ConnectHandlerSwitch_1 = {“device_type”: “cisco_ios_telnet”,“host”: “192.168.1.192”,“username”: “admin”,“password”: “P@ssw0rd”,}config_commands = [ ‘logging buffered 20000’,‘logging buffered 20010’,‘no logging console’ ]net_connect = ConnectHandler(**Switch_1)output = net_connect.send_config_set(config_commands)print(output)net_connect.disconnect()
ผลลัพธ์ที่ได้ จะออกมาเป็นแบบนี้

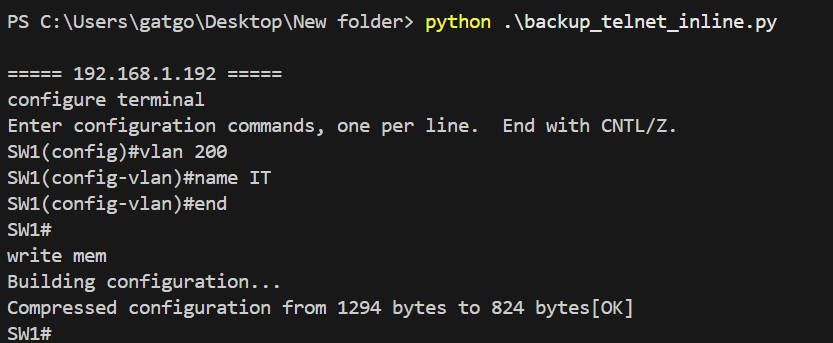
ทีนี้ เรามาลองเข้าโจทย์ของเรากันบ้างครับ คือ สร้าง VLAN ให้กับ Switch หลายๆตัว ในที่นี้จะยกตัวอย่างเป็น VLAN 200 ครับ โดย Script จะเขียนประมาณนี้ครับ
from netmiko import ConnectHandlerswitch_devices = [{“device_type”: “cisco_ios_telnet”, “host”: “192.168.1.192”, “username”: “admin”, “password”: “P@ssw0rd”},{“device_type”: “cisco_ios”, “host”: “192.168.1.193”, “username”: “admin”, “password”: “P@ssw0rd”},{“device_type”: “cisco_ios”, “host”: “192.168.1.194”, “username”: “admin”, “password”: “P@ssw0rd”},]config_commands = [“vlan 200”,“name IT”,]for device in switch_devices:conn = Nonetry:conn = ConnectHandler(**device)print(f”\n===== {device[‘host’]} =====”)out = conn.send_config_set(config_commands)print(out)save = conn.save_config()print(save)except Exception as e:print(f”ERROR on {device[‘host’]}: {e}”)finally:if conn:conn.disconnect()
ผลลัพธ์ที่ได้ จะออกมาเป็นแบบนี้
และโจทย์ทำการ Backup Config ของ Switch เก็บไว้ในเครื่องคอมพิวเตอร์ Script จะมีหน้าตาประมาณนี้ครับ
from netmiko import ConnectHandlerfrom datetime import datetimeimport reimport osswitch_devices = [{“device_type”: “cisco_ios_telnet”, “host”: “192.168.1.192”, “username”: “admin”, “password”: “P@ssw0rd”},{“device_type”: “cisco_ios”, “host”: “192.168.1.193”, “username”: “admin”, “password”: “P@ssw0rd”},{“device_type”: “cisco_ios”, “host”: “192.168.1.194”, “username”: “admin”, “password”: “P@ssw0rd”},]show_command = “show running-config”for device in switch_devices:conn = Nonetry:conn = ConnectHandler(**device)print(f”\n===== {device[‘host’]} =====”)conn.send_command(“terminal length 0”)# Get Hostnameprompt = conn.find_prompt()hostname = re.sub(r”[#>]\s*$”, “”, prompt)safe_host = re.sub(r”[^A-Za-z0-9._-]”, “_”, hostname)out = conn.send_command(show_command)print(“Collected running-config”)# save to …ts = datetime.now().strftime(“%Y%m%d-%H%M%S”)filename = f”{safe_host}_{ts}_backup_config.cfg”with open(filename, “w”, encoding=”utf-8″, newline=”\n”) as f:f.write(out)print(f”Saved to {os.path.abspath(filename)}”)except Exception as e:print(f”ERROR on {device[‘host’]}: {e}”)finally:if conn:conn.disconnect()
ผลลัพธ์ที่ได้ จะออกมาเป็นแบบนี้


สำหรับตัวอย่างเบื้องต้นที่แนะนำเป็นแค่ส่วนเล็กๆของที่ netmiko ทำได้นะครับ เพื่อนๆสามารถนำไปประยุกต์กับการใช้งานได้หลากหลาย เช่น อัพเกรด Firmware ของอุปกรณ์ ทำ Backup Configuration หรือแก้ไข Config ของ Port หลายๆ Switch (เช่นเพิ่ม Access Point) โดยสามารถไปดูตัวอย่าง Script ได้จากที่ https://github.com/ktbyers/netmiko/blob/develop/EXAMPLES.md และสามารถไปอ่าน Python API Document ได้จาก https://ktbyers.github.io/netmiko/docs/netmiko/index.html ได้เลยครับผม